OpenType Kerning
Older versions of FontCreator and older applications only support a kern table. However, modern fonts and modern applications use the more powerful OpenType GPOS (Glyph Positioning) kerning feature. Recent versions of FontCreator will allow you to export fonts with this legacy kern table to support older applications.
Adding an OpenType Kerning Feature
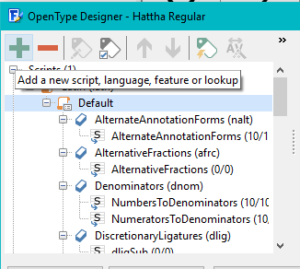
Open the OpenType Designer (Ctrl+F8). If a font has no OpenType features yet, or if you clear the existing features, the dialogue will look like this: No scripts, no features, and no lookups.
![]()
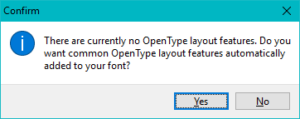
If you click on the Code Editor… button, you will be presented with this dialogue asking if you wish to add some common OpenType features to your font. Click on OK to accept the suggestion.
FontCreator will now search your font to see what glyphs it contains and add some common OpenType features with suitable lookup tables for your font.

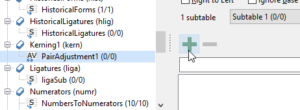
Close the dialogue to see the folder tree listing the Features and Lookups added to the Default language.
Adding the Feature and Lookup Table
With the Default language selected, click the Big + button at the top left to add a new OpenType feature to your font.
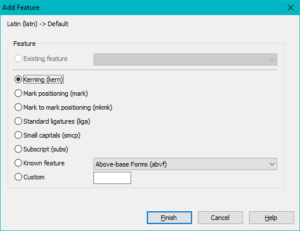
The Kerning feature will be selected already, so just click on Finish to add it.
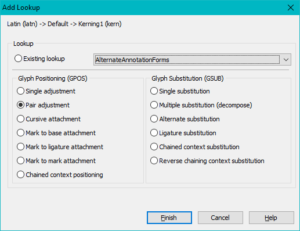
The kerning feature now needs a lookup table so select the kerning feature and click on the Big + button again to add a lookup table. The Pair Adjustment table will be selected already, so just click on Finish to add it.
You now have an empty Kerning feature and lookup, so you need to add some adjustment pairs to the table. Click on the Apply button at bottom right to save your changes. Repeat this regularly as you add more kerning pairs to the lookup table.
Adding Adjustment Pairs
Modern fonts may have thousands of adjustment pairs. The Professional Edition of FontCreator can automate this process with the Autokern feature. The Home Edition can greatly speed up the process by importing scripts exported from other fonts. To add adjustment pairs, click on the Big + button below the list of subtables.
This will open the New Pair Adjustment dialogue.
FontCreator supports the kerning of pairs of Glyphs, e.g. AY or pairs of kerning classes. A kerning class like @A_Caps will include A, À, Á, Â, Ã, Ä, Å, Ā, etc., while the @Y_Caps kerning class might contain Y, Ý, Ŷ, Ÿ, Ỳ, and Ỹ. Kerning classes can contain many more glyphs, but just with these few, one kerning pair of @A_Caps with @Y_Caps will generate 48 (8×6) kerning pairs. This is many times more efficient than adding individual pairs of glyphs, but for now we will skip that, and just add a few pairs for AY, AW, AV, and AT for illustration purposes.
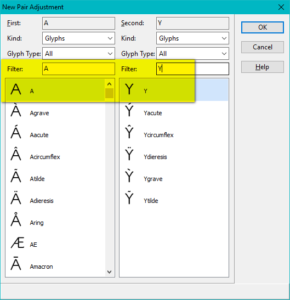
In the New Adjustment Pair dialogue, illustrated above, select Glyphs for the type for both the first and second glyph of the pair. Type a capital A in the filter on the left, and a capital Y in the filter on the right to quickly find the A and Y glyphs. Select A and Y, and click on OK.
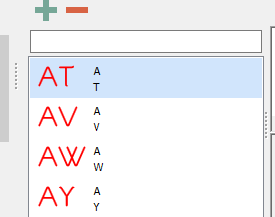
Click the Big + again (or use the shortcut key Insert) to add another pair, and clear the Y from the filter for the second glyph. Now you see why I started at the end of the alphabet: W will be visible in the list. Select that and click OK to add the AW pair. Repeat until done.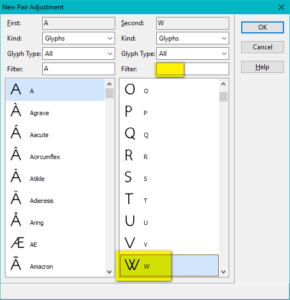
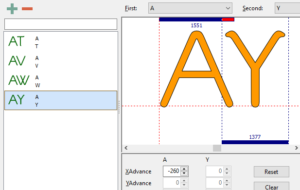
Adjusting the Kerning Pairs
After adding the pairs, all of the values will be zero, which is useless, so we need to adjust them using the Cursor keys on the keyboard, or by dragging the first glyph to adjust its XAdvance, or by typing in a specific value for the XAdvance. I find that using the cursor keys is the quickest method. Select the pair in the column on the left: use Shift+Left/Right cursor to adjust the spacing by 100 funits; use Left/Right cursor on its own to adjust by 10 funits, and Ctrl+Left/Right cursor to adjust the XAdvance by 1 funit.
When done, click on OK to exit the OpenType Designer and save your changes, and save your project file too with Ctrl+S.
Kerning Classes
As noted above, it is much more efficient to use class-based kerning instead of kerning individual glyph pairs. At the top of the OpenType Designer dialogue, click on the icon to Open the Class Manager. My Verajja font already includes a lot of kerning classes for Capitals, Lowercase, Small Capitals, Petite Capitals, etc.
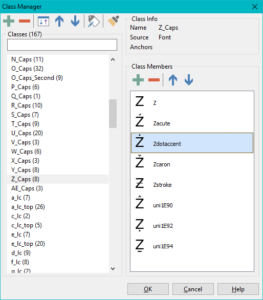
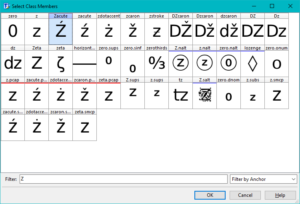
The @Z_Caps class contains eight Z glyphs. I deleted the Z acute, then clicked on the + sign to add it back again. After typing Z in the filter, the Select Class Members dialogue shows all glyphs with z in the name, except for those that have already been added to the class. I can quickly see that Z acute is now missing, and select it for adding back.
One could also add DZ, but one has to consider what would be the effect if DZ was the second glyph in a kerning pair. For lowercase a, I have created two classes, @a_lc where the accent will not class with preceding glyphs: a, ą, æ, etc., and @a_lc_top where the accent will class with the preceding glyphs: á, à, ä, â, etc.
A pair like Ta can be kerned more tightly than a pair like Tä, so I have two separate classes.